Pages
▼
Thursday, January 31, 2013
My First Attempt With Flocking Powder
A couple of weeks ago I ordered a set of flocking powders on ebay. I got them in the mail last week and immediately had to try them out. The first one I tried was this gray one because it matched China Glaze Recycle almost perfectly.
Now, Here are my thoughts on this: I really thought I would like the flocking powder. I don't mind the feeling of things on my nails, and I know some people are bothered by things like that but I don't mind, so I thought I'd like this a lot.
After using this I have a very meh feeling about it. I think it could be because I used a nail color that dried slightly fast, but a ton of the little fibers fell off within an hour! I found that odd because I would paint a coat of nail polish and I immediately would pour some of the powder on and then press it into the polish.
Next time I'll use a nail color that doesn't dry so fast. I really want to like this and it felt really awesome, but I need to do some experimenting.
Tuesday, January 29, 2013
Baroque Print
I have been seeing tons of beautiful baroque print nails all over the place, so I was inspired to try my own! To start off, I searched "baroque print" in google search and tried to emulate some of the designs I liked. I didn't really try to do any exact copied of the patterns, I wanted to incorporate a lot of the ornate swirls and things that I liked in the designs I looked at.
The nail colors I used for this were Ciaté Twilight and Ciaté Ladylike Luxe. Twilight is a black nail polish with teeny tiny gold glitter flecks throughout it. Ladylike Luxe is a gold foil that, for some reason, came out looking slightly green in my pictures. I can tell you that it doesn't have that weird green tinge in real life.
I used a thin striper brush to do these designs. I messed up quite a few times, and I actually redid the bottom half of the design on my ring finger. Good thing I used black so it was easy to fix any mistakes! I'm really in love with the design on my index finger and I'll probably do something with a design similar to that in the future!
Friday, January 25, 2013
Baker Street accented with Whirled Away
I've had China Glaze Whirled away for a while now and have been meaning to use it, but I just kept forgetting. I finally used it earlier this week and I can't believe I've waited so long to use it! I chose to use this color over Nails Inc Baker Street because I felt like this would look best over some sort of cream color.
This one was a little difficult to apply because the glitter is so large and it required some fishing for the large white hexes. I used two coats of Baker Street and two coats of Whirled Away on each accent nail and finished with a coat of Seche Vite.
This one was a little difficult to apply because the glitter is so large and it required some fishing for the large white hexes. I used two coats of Baker Street and two coats of Whirled Away on each accent nail and finished with a coat of Seche Vite.
Tuesday, January 22, 2013
Zoya Aurora
Hey guys! A couple of weeks ago Zoya had a coupon code for 3 free nail polishes if just pay the shipping. Here is one of the colors that I got, Zoya Aurora. Zoya describes this color as "a full coverage, medium sugarplum purple flecked with a high concentration of micro fine diamond holographic glitter." and it is magical!
 |
| I added this slightly blurred picture to show the holo |
I'll be completely honest and tell you that I've never been very fond of purple. This purple, on the other hand, is filled with holographic amazingness so I thought "Hmm I'll try this out anyway." I can't tell you how glad I am that I got this, I've ever seen anything like it and it's really unique to my collection.
This nail polish is not a straight up holo, the base of this was almost like a jelly and the flecks of holo are larger than in a regular holographic polish. The formula on this was really great. It went on smooth, and this was only two coats!
I also wanted to add that this is my 100th blog post!! Have an awesome day everyone!
Thursday, January 17, 2013
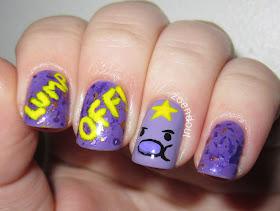
Lump Off! Lumpy Space Princess Nails
"WHATEVER IT'S 2009!" Any Adventure Time fans? If you've ever seen the show I'm sure you know about Lumpy Space Princess or, LSP for short. She is the princess of Lumpy Space, if you couldn't tell already, she's a purple, lumpy teenager with a masculine voice (She's voiced by the shows creator, Pendleton Ward) and she's lumping awesome!
Haha I planned on doing these nails since I purchased Pretty and Polished My Lumps from the Mathematical Collection. The polish is Lumpy Space Princess themed with a purple jelly base and purple and yellow flakie shards. I layered this over one coat of OPI Done Out In Deco on each finger besides my ring finger which has just two coats of Done Out In Deco.
I drew LSP's face and "Lump Off!" with black, yellow and purple acrylic paints. I wanted the letters to have a lumpy look to them, so I used a dotting tool to dot them on. The purple was used for the inside of her mouth and I finished with design with one coat of Seche Vite.
Wednesday, January 16, 2013
Pretty and Polished Dolli-Pop
Dolli-Pop is a color changing nail polish that changes based on the temperature of your body. This nail polish is blue when warm and purple when it's cold. This is two coats.
This picture shows the nail polish just regularly on my nails. The tips are purple because they don't touch my skin, this gives it a gradient effect.
This is just after running some cold water over my nails.
Here it is after running hot water over my nails.
This is a few seconds after running hot water over my nails, the water drops were cooling and changing the polish to purple in some spots. I thought it looked cool.
Tuesday, January 15, 2013
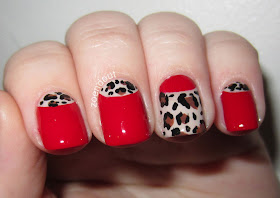
Sassy and Classy Red Leopard half moons
Hey guys! Here are some nails I did that other day that I'm slightly obsessed with: Red Leopard Half Moon nails!
To do this, I started with two coats of Ciaté Cookies and Cream and let that dry. Then I outlined where I wanted my half moons to be with a small brush dipped in Butter London Pillar Box Red and then filled in the rest of my nail with that color. On my ring finger I just filled in the opposite side of the moon. I don't have any of those white paper reinforcements, so I just draw my half moons.
Then, I took a dark brown, I used Kleancolor Cappuccino, and just made some random spots over the parts of my nail with Cookies and Cream showing. I did that on each nail, and then with a small brush and black acrylic paint, I outlined each brown spot with either a "C" shape or a bracket type shape. I then added some small black spots in the empty spaces. Finish off with top coat and you're done!
Friday, January 11, 2013
Watercolors!
Hey guys! Sorry I haven't updated in a while again, my computer decided it wanted to stop working again. Everything is good now, and I'm back for real this time haha!
I'm sure you guys may have seen some "watercolor" nails before. I saw a bunch of them last year and never got around to trying it, but I finally did and I really love how them came out!
So, you probably know that this wasn't really made using watercolor, but with nail polish that has been sort of diluted with acetone. Using a nail brush dipped in acetone makes the colors almost like watercolor paints!
I used this tutorial, and started with a white base and picked a few colors that I thought would look nice together. I was going for something that looked like stormy clouds at first, so I started with some gray, blue, and purple, colors. I started with the color that I wanted to show up the least, the gray. After waiting a few minutes for the white to dry, I put about two or three drops of gray onto the white and then, with a brush dipped (not dripping, wipe it off a bit) in acetone, I dabbed with brush onto the dots of color and dabbed it around the nail.
I did this to each nail with each color until I liked the results. At the last minute I added some neon yellow and green (and I'm super happy I did), because it looked really boring and bland with just purple, blue and gray. Then, I finished with one coat of Seche Vite!
I am so in love with how this turned out! You will probably be seeing more watercolors from me in the future. ;)
Here are the colors I used for these nails
- Essie - Blanc
- Zoya - Dove
- Ciaté - Headliner
- Essence - A Lovely Secret
- Color Club - (this one has no label)
- Funky Fingers - Tortuga
- Sinful Colors - Neon Melon
Wednesday, January 2, 2013
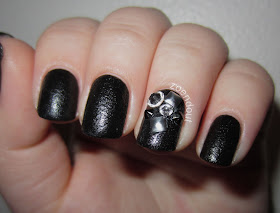
Nails Inc. Bling It On - Rebel Leather Effect Nail Kit
Hey guys I'm back! I hope everyone had an awesome and happy new year! It feels like I've been away for so long, I'm sorry I haven't posted in a while, I was enjoying the holidays and to be honest I didn't do anything very special to my nails. For my first post of the new year I have something very special... Leather Nails!
About a month ago I'd heard about Nails Inc releasing this Leather Effect nail polish in the UK and how It'd sold out in minutes. When I saw a few swatches of it I knew exactly why, this polish looks just like leather and it's awesome.
So, last week when I was browsing Sephora.com I saw that Nails Inc had a new kit that included the leather nail polish, Bling It On - Rebel. Luckily, I had a gift card, so I snatched this up! I know that this sort of thing isn't everyone's cup of tea, but
personally, I love love love this. I love all things leather and studs,
so this is perfect for me.
Speaking of texture, I've noticed that texture is going to be a pretty big trend with polish companies in 2013
Here's one of the skull studs on my thumbnail.
Here are some pics of the kit, This kit includes (from the sephora site)
- 0.33 oz Leather Effect Nail Polish
- 4 Skull Embellishments
- 10 Studs
- 50 Swarovski Elements Crystals
- 0.1 oz Nail Glue
- 2 Cuticle Sticks
- 4 Skull Embellishments
- 10 Studs
- 50 Swarovski Elements Crystals
- 0.1 oz Nail Glue
- 2 Cuticle Sticks
This was $25 on sephora.com so it is a little pricey for a polish and studs. I probably wouldn't have purchased this if I didn't have a gift card, and although I really like the crystals and skull and studs in this, I wish they would just let you purchase the polish by itself.


